Custom XSLT in BizTalk:


Creating custom XSLT for map:


Debugging XSLT :


· Why to use Custom XSLT?
· How to use/create Custom XSLT?
· Debugging the custom XSLT.
· Testing the custom XSLT.
Why to use Custom XSLT?
While achieving your business goal with map transformation you might come across some situation where the default provided functoid may not be smart enough to do your task and to achieve that goal of your task you need some deep level mapping changes which will lead you to write your own custom XSLT.
It’s not good practice to write custom XSLT each and every time, for simple mapping or transformation which you can achieve using available functoid then you should use that instead of writing custom XSLT. It’s good practice to write custom XSLT when you have complex mapping in your maps transformation.
How to use/create custom XSLT?
To achieve this goal, we will create a sample BizTalk application with One Orchestration, 2-schema and 0ne map. Orchestration receive the request send it to map for transforming it to response and then send back the response.
In this case the mapping/transformation is simple but still I am using custom XSLT is just to explain “How we can use Custom XSLT?”. We will take a simple request/response with very few fields in it so that it will be easier for us to understand.
Request Schema:

Response Schema:

Map:
With no Request- Response mapping, Mapping is done in XSLT.

Creating custom XSLT for map:
Please follow the following steps to create custom XSLT
1. Add 2-3 fields mapping from source schema to destination schema.
2. Here we will add mapping between FirstName to Name and OffAddress to address node in response.

3. Right click the map (XEmpReq_To_EmpResp.btm), click Validate map.

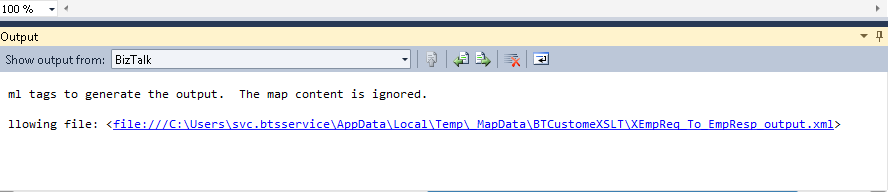
4. Go to “Output Window”, you will see following Invocation Object.
Invoking component...
C:\BT_CustomXSLT\BTCustomeXSLT\BTCustomeXSLT\XEmpReq_To_EmpResp.btm: warning btm1028: The required field "EmpID" has no incoming link, constant value, or default value.
C:\DEVELOPER\BT_CustomXSLT\BTCustomeXSLT\BTCustomeXSLT\XEmpReq_To_EmpResp.btm: The output XSLT is stored in the following file: <file:///C:\Users\ \AppData\Local\Temp\_MapData\BTCustomeXSLT\XEmpReq_To_EmpResp.xsl>
C:\DEVELOPER\BT_CustomXSLT\BTCustomeXSLT\BTCustomeXSLT\XEmpReq_To_EmpResp.btm: The Extension Object XML is stored in the following file: <file:///C:\Users\\AppData\Local\Temp\_MapData\BTCustomeXSLT\XEmpReq_To_EmpResp_extxml.xml>
Component invocation succeeded.
5. Click on the XSL link,

6. Copy the file from temp location and paste it to your solution.

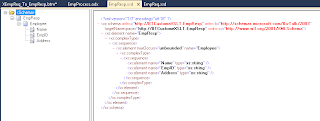
7. This is the custom XSLT file created for us, it has coded mapping for FirstName and Address as we had mapped that fields in maps.
<?xml version="1.0" encoding="UTF-16"?>
<xsl:stylesheet xmlns:xsl="http://www.w3.org/1999/XSL/Transform" xmlns:msxsl="urn:schemas-microsoft-com:xslt" xmlns:var="http://schemas.microsoft.com/BizTalk/2003/var" exclude-result-prefixes="msxsl var s0" version="1.0" xmlns:ns0="http://BTCustomeXSLT.EmpResp" xmlns:s0="http://BTCustomeXSLT.EmpReq">
<xsl:output omit-xml-declaration="yes" method="xml" version="1.0" />
<xsl:template match="/">
<xsl:apply-templates select="/s0:EmpReq" />
</xsl:template>
<xsl:template match="/s0:EmpReq">
<ns0:EmpResp>
<xsl:for-each select="Employee">
<xsl:for-each select="Address">
<Employee>
<Name>
<xsl:value-of select="../FirstName/text()" />
</Name>
<Address>
<xsl:value-of select="OffAddress/text()" />
</Address>
</Employee>
</xsl:for-each>
</xsl:for-each>
</ns0:EmpResp>
</xsl:template>
</xsl:stylesheet>
8. Now, we need to write mapping/coding XSLT as per our business requirement.
<?xml version="1.0" encoding="UTF-16"?>
<xsl:stylesheet xmlns:xsl="http://www.w3.org/1999/XSL/Transform" xmlns:msxsl="urn:schemas-microsoft-com:xslt" xmlns:var="http://schemas.microsoft.com/BizTalk/2003/var" exclude-result-prefixes="msxsl var s0" version="1.0" xmlns:ns0="http://BTCustomeXSLT.EmpResp" xmlns:s0="http://BTCustomeXSLT.EmpReq">
<xsl:output omit-xml-declaration="yes" method="xml" version="1.0" />
<xsl:template match="/">
<xsl:apply-templates select="/s0:EmpReq" />
</xsl:template>
<xsl:template match="/s0:EmpReq">
<ns0:EmpResp>
<xsl:for-each select="Employee">
<xsl:for-each select="Address">
<Employee>
<Name>
<xsl:value-of select="../FirstName/text()" />
<xsl:value-of select="../LastName/text()" />
</Name>
<EmpID>
<xsl:value-of select="../EmpID/text()" />
</EmpID>
<Address>
<!--<xsl:if test="HomeAddress/text() !=''">
<xsl:value-of select="HomeAddress/text()" />
</xsl:if>
<xsl:if test="OffAddress/text() !=''">
<xsl:value-of select="OffAddress/text()" />
</xsl:if>-->
<xsl:choose>
<xsl:when test="HomeAddress/text() !=''">
<xsl:value-of select="HomeAddress/text()" />
</xsl:when>
<xsl:otherwise>
<xsl:value-of select="OffAddress/text()" />
</xsl:otherwise>
</xsl:choose>
</Address>
</Employee>
</xsl:for-each>
</xsl:for-each>
</ns0:EmpResp>
</xsl:template>
</xsl:stylesheet>
This is our XSLT with all the required business logic,
Name field is mapped with “FirstName” and “LastName”
EmpID is directly mapped with EmpID of destination schema.
For Mapping “HomeAddress”/”OffAddress”, we have used When & Otherwise. As we need to map the home address if it’s present in the request and if HomeAddress is not present then need to use OffAddress fields. So to implement this condition we have used When & Otherwise.
9. Once XSLT development is completed, go to Map à click the area between source and destination schema, where we put the functoids , Right click à go to Properties à check property name “Custom XSLT Path :” Select your XSLT file path. (Must be inside project/solution directory).
Ex: Custom XSLT Path : C:\DEVELOPER\BT_CustomXSLT\BTCustomeXSLT\BTCustomeXSLT\XEmpReq_To_EmpResp.xsl
10. Right click on map(XEmpReq_To_EmpResp.btm), à Properties à Go to property Test Map Input Instance : Select your test request.
Ex: Test Map Instance : C:\DEVELOPER\BT_CustomXSLT\SampleSchema\EmpReq_output.xml


11. Sample Request (EmpRew_Output)
<ns0:EmpResp xmlns:ns0="http://BTCustomeXSLT.EmpResp">
<Employee>
<Name>FirstName_0LastName_0</Name>
<EmpID>EmpID_0</EmpID>
<Address>HomeAddress_0</Address>
</Employee>
<Employee>
<Name>FirstName_1LastName_1</Name>
<EmpID>EmpID_1</EmpID>
<Address>OffAddress_1</Address>
</Employee>
</ns0:EmpResp>
12. Now once the test instance specified, validate the instance, validated the map. Need to test map.
13. Right click Map à Click Test Map, will give response schema as output in “Output Window”.

14. Go to “Output Window”, Click on XEmpReq_To_EmpResp_Output.xml
15. This is what our desired output response.
<ns0:EmpResp xmlns:ns0="http://BTCustomeXSLT.EmpResp">
<Employee>
<Name>FirstName_0LastName_0</Name>
<EmpID>EmpID_0</EmpID>
<Address>HomeAddress_0</Address>
</Employee>
<Employee>
<Name>FirstName_1LastName_1</Name>
<EmpID>EmpID_1</EmpID>
<Address>OffAddress_1</Address>
</Employee>
</ns0:EmpResp>
16. Hence we can conclude that our map is tested and working as per our business requirement.
Debugging XSLT :
Debugging XSLT is good tool to debug the XSL file when it’s not working as per our business or throwing some un-expected errors.
1. To start debugging, Click on “Debug” at the top of Visual Studio à click “Start XSLT with Debugging”

2. You must have at least one break-point in your XSLT.
3. Then it will ask you for “Input XML Instance”, you can choose the file for which it is failing. Click Open.

Comments
Post a Comment